Homesteading Forum banner

Making silage at home?

21K views 8 replies 7 participants last post by  Plowpoint  
#1 ·
Anyone ever try it? I would like to give it a go. Not sure what type/size chipper I would need and also where to store it...plastic bags or some kind of bin. Also how to keep mice and rats off it.
 
#2 ·
Silage will spoil if any air gets to it. You might chop it into a barrel, but you would have to pack it down as you filled the barrel. All the air needs to be pressed out of the silage. The top would need to be sealed air tight.
If the silage is chopped to wet it will just rot. if it is too dry, it will mold. I can't tell you what the propper moisture percentage needs to be, but it seems like it was around 30 percent moisture. There is a preferred range.
 
#3 ·
I've had good luck with this, using two very different wood chippers and sweet corn stalks. Also made bulk kraut one year with a chipper and all the left over "cole crops".

Uncle Will has it in that all air must needs be pressed/stomped out of the pack.
I have used plastic 55 gallon drums with sealed lid and ring, as well as a pile in the corner of the barn, setting on a plastic base and wrapped/packed tight with a plastic sheet cover in overlapping layers.

In both methods there was a bit of spoilage over the top, but a good core of very sweet silage (and kraut) that the animals all fell all over when it was offered them.

That partially molded outer crust makes a great addition to the compost pile. :thumb:
 
  • Like
Reactions: unregistered168043
#4 · (Edited)
50%-60% is about right for silage.
You can make it wetter, I've put up grass silage which was direct cut by the chopper and then ensiled. Very wet and smelly but the cows loved it.
Too dry and it doesn't ferment properly.

As a homesteading sort I've put up both hay and corn silage in plastic garbage bags.
The hay silage was actually lawn clipping we swept up and ensiled the day after mowing(just like I would do with good hay silage). However grass is a lot drier overall than a good lush hay field and I would mow in the morning and put it up in the afternoon if I had to do it again.
The corn silage was a mix of old sweet corn that didn't get picked and some field corn we planted just for the occasion. Cut it with a corn knife, stacked on a wagon and hauled to the shed for processing.

As for the process, I live in a very cold area and have spent my share of chore time chipping frozen silage off a silo wall. So I decided barrels were out. No sense have silage that I couldn't get out of them because it was frozen in.
I went with heavy duty garbage bags. With the hay silage I also had access to 30 or so 5 gallon buckets with lids so we poked and stuffed the bags full in the buckets, taped them shut then put the lids on. It was drier stuff but it fermented OK, just didn't have the texture I was looking for. The goats loved it though.

For the corn silage I started out with a small chipper and quickly decided that something else had to be done so I bought a real forage chopper body cheap (it was small by todays standards) and used that.
With the chipper the outlet is right down by the ground so you are constantly moving the chipper or forking as fast as you can. With the chopper I blow a bunch into a foldable plastic pallet and when that's full I start filling bags.
As for the bags, corn silage is not as soft and fluffy as hay silage so I fork old feed sacks full, then tamp, smack, beat and in general treat them with disrespect until I can get no more corn in. Then I put that sack in a large garbage sack and apply vacuum from an old upright that the wife no longer uses. The whole package shrinks down to less than half size. Twist the plastic garbage bad and tape with duct tape.
Next year I may try putting two feed bags into one garbage bag after vacuuming them.

Mice are a problem with the corn silage, I lost a few bags to the critters. And I mean lost, they took every thing and left the plastic.

If you do a barrel I have seen plans for building a hydraulic pusher to squeeze it full. Or you could build a stand with a big lever and a pad, similar to a homemade pine needle baler.

The key is getting a good pack, upright silos have tons of feed doing that, bags have a bagger that pushes the stuff in, bunkers use tractors or crawlers to do it......

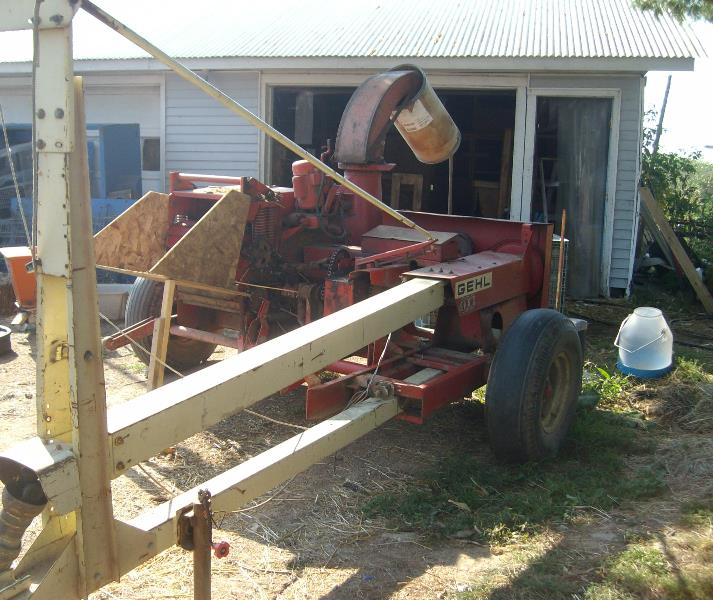
Here is my rig for doing silage, you can see the old chipper in the background. The chopper is modified a bit. The spout is not stock, it's far shorter, I believe it is an old spout from some silo pipe. The cardboard barrel directs the stuff into my pallet.
Image
 
#5 ·
Some folks like to add a bit of salt (e.g., water softening salt) to each layer. How much? You will have to experiment.

Consider double bagging. Force all air possible out of one, tie it off, then force out as much as as possible before tying the outside bag. If no holes, bags can be used for several years.

If a plastic barrel, suggest plastic around the threads before sealing as tight as you can.
 
#6 ·
Feed silage? Heck that is all I do.

While feeding corn began out of economics, I have grown to like feeding corn and plan to continue the practice, increasing the scale in time with my sheep operation. What makes it beneficial to me, may also have make it beneficial to other Shepard’s with micro-flocks.

Here 100 day corn yields average 20-25 tons to the acre, while hay ground yields only 10 tons to the acre. The difference is staggering. For those without a lot of extra acreage, a ¼ or ½ acre plot may be able to reduce their winter feed purchases by 40%.

Another alternative is to approach area farmers with existing corn fields and purchase a ½ or ¼ acre plot off them. By using their seed purchased in bulk, and their larger tilling and planting equipment, this is an economical way to obtain corn.

If you are like me though, and just enjoying growing your own feed, thankfully the equipment to plant corn is the same as planting a home garden, and many small scale Shepard’s already own the equipment and have the knowledge to do it. Soil can be tilled by other means as well, including renting equipment, contracting it out, or in the case of plots less then ½ an acre, do it themselves with garden tractors and rotor-tillers. While no-till farming on my farm is not possible, other areas of the country may be able to avoid tilling altogether.

Seeding can be sown by hand or by the use of a single row, push behind planter. I do recommend planting the corn in rows to ease the harvesting of it, but even that is a personal choice. For those that choose to forgo the standard 30 inch rows, studies have proven that increased seed densities per acre increase yields significantly without unduly stressing the plant from overcrowding.

As for harvesting, by using nothing more than a chainsaw, a tractor and a brush chipper, standing corn can easily be converted into sheep feed. After waiting for a killing frost, I simply walked down the rows with my saw held at 8 inches high and felled the stalks. These were gathered up; taken home and stored under cover. As I fed it out to my sheep, I ran the entire stalk through my brush chipper into ¼ chips. Alternatives exist of course and could include using a hand scythe to sever the stalks and a cart to move them under a tarp, or simply fencing in the corn plot and letting the sheep graze on the stalks in the winter.

Assuming you are feeding out, the chipper is the only critical piece of equipment, and its small size is surprising. I use a 5 hp Troy-Bilt Tomahawk chipper/shedder that takes a 3 inch branch, but a smaller or larger one would also work. The stalks are easily severed into chips and blown onto the ground or into a container. The smaller the “chip” the better as it tends to grind the cobs into individual kernels and allow the rumen to extract the nutrients from the finely chopped corn. Even more important, what comes out of the spout of my homeowner chipper, is exactly the same of a ¼ million dollar silage chopper. In short, you do not need expensive equipment to produce high quality silage.
 
#7 ·
As with feeding anything non-traditional, there are precautions a Shepard must take to ensure the health of his flock. The first is storage of the corn stalks. In large farming operations the stalks are immediately chopped and blown into trucks that put it in upright silos or in horizontal bunkers. Unfortunately, neither storage method is practical for the small scale Shepard. The only practical way to store corn is by covering it and allowing the air to dry it so that it does not rot or mold.

Listeroisis is a disease that sheep are especially susceptible to and develops from the black mold of unensiled, or mold ridden feed, so storage is especially important. I like to store my corn stalks on logs so that it is not directly on the ground, cover them with a tarp, but leave the sides open so that the wind can blow through the pile to ensure proper drying. It should be noted that this complete drying does change the status of the plant significantly. Having dried, the plant converts all its sugar into starch which is what gives the sheep its energy. It does make the stalk and leaves slightly less palatable, but my sheep still prefer it over that of hay.

Another caution I must make is that while a Shepard might be inclined to feed straight corn silage, it really must be mixed with hay, haylage, balage or green chop, and for two reasons. Corn silage can be acidic in nature and cause the rumen of sheep to be inflamed. Hay or a variation thereof, helps to settle their stomachs and is a common practice on dairy farms. As added insurance, I like to give my sheep probiotics to ensure the rumen is working properly and is aiding digestion. The second reason is corn silage shortcomings in regards to protein and calcium. Fortifying with Urea (45% nitrogen) can be accomplished, but failure to get the right ratio right can result in death. For that reason I am a strong advocate of using corn silage to reduce the dependence on hay, but not eliminate its place in the manger.

While debating the concerns of genetically modified foods is beyond the scope of what I am saying here, it is in a Shepard’s best interest to select their seed carefully, or if purchasing standing corn from dairy farmers, to ask of its status.

The final caution is rather strong, and that is to refrain from feeding lambs corn silage. Lambs lack the rumen size to allow enough corn silage intake to get the nutrients they need. They literally can be stuffed from eating, and yet die from starvation. Good quality hay must always be available for lambs.
 
#8 ·
You might want to use the KISS Method just cut the Corn when Green but Kernals are filled out and Shawk (sp) it up did this with Cane too.

big rockpile
 
#9 ·
There is varying degrees of thought on that Rockpile. We got three big dairy farms in the family and every one of them uses a different nutritionist and each one has a differing opinion on when to cut corn.

The biggest dairy farm's nutritionist says; cut the corn after its been hit with frost to let the corn die back a little and dry, therefore you are cutting the corn while in the "dent"

The medium sized dairy farm nutritionist says: cut the corn while it is in the "dent" but before it is frost killed and still all green

The smaller dairy farm nutritionist says; cut the corn while the kernels are in the "dough".

I have no idea which one is better. I would think putting the silage up in the dough would be better because the pile itself, with plenty of time, converts the sugars into starch much better. But if you do that, you are not going to glean as much nutrition from each kernel either, especially if you have a cracking head on your chopper, and at today's prices for grain, what enterprising farmer does not have that! But there again, cutting it while green and completely in the dough means you are trucking 30% water, and at today's fuel prices, well that gets expensive too.

I guess today us farmers just can't win.

If I was to offer a guess, and it would be just that, a guess...I would, and always have, chopped my corn in the "dent" and with significant dry-down. I would think that would be best given the issue with listerosis and mold.